Summer’s A Lemon – Both Bitter and Sweet {Lemon Chiffon Cake}

20120830-220235.jpg

Everywhere I go this time of year, I am bombarded with advertisements and reminders making me aware that school is just around the corner. Labor Day is fast approaching, the last day to relish the careless attitude and worry free aura donned by these past few summer months. Gone are the days of staying out late with friends, spontaneous trips to the Ice Cream Shop, and sleeping in past nine.

But as the Summer of 2012 comes to a close, another chapter of our lives begins. A chapter filled with opportunities, chances to learn and to live; hopes, dreams, ambitions and desires just waiting to be fulfilled; challenges and accomplishments you cannot yet imagine. As I sat contemplating this, and the fact that my bikini probably won’t see the light of day until next summer, I decided to pay homage to my last lazy days with something citrusy and tart, a true flavor embodiment of the sunshine months.

To mark the end of the summer and the beginning of a new school year I created a Lemon Chiffon Cake. This was my first attempt at a fancy Chiffon cake and to tell you the truth, I had absolutely no idea what it was. After a little research online I found out all I needed to know. Chiffon is very similar in texture to Angel Food Cake but is just a bit less dense and has a fine crumb. Even though there is only oil in the cake, the taste still has those subtle buttery undertones. Chiffon combines the best qualities of butter cake, sponge cake, and Angel Food Cake to make softly sweet, light, and airy layers. It pairs well with fillings that need to be refrigerated and won’t become firm and stale-textured in the fridge.

I spread the cake layers with a coating of smooth, tart Lemon Cream and topped that with some Italian Meringue Buttercream. The citrus flavor throughout is just sweet enough and is the perfect end to a perfect summer.

This cake would be a huge hit for the Labor Day weekend and will allow you to savor and celebrate the last few dwindling days of your summer freedom.

You can easily double the recipe to make enough for two 9″ round cake pans.
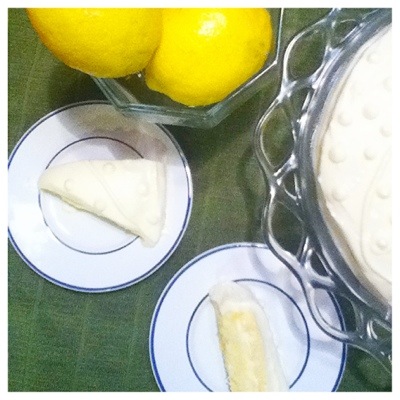
20120830-220402.jpg

Lemon Chiffon Cake

Recipe adapted from whisk-kid.com

Lemon Cream:

1/2 c Sugar
1/2 c Lemon Juice
2 Eggs
1/2 c (1 stick) Butter-cut into cubes, room temperature

Fill a sink with an inch or two of cool water. You will be placing your hot bowl in here to stop the cooking process.

Place a heatproof bowl over a pot of a small amount of simmering water to create a make-shift Dutch Oven. Off of the heat, beat the eggs well and add the sugar and lemon juice and combine. Now put the bowl over the pot of water and cook the mixture, stirring constantly with a wooden spoon until it reaches 180 degrees F on a candy thermometer or turns glassy, thickens, and leaves trails of ridges when whisked.

Move the bowl off the heat and into the basin of cool water for a few moments or until the mixture reaches 140 degrees F. Whisk in the butter, one cube at a time, making sure to keep the mixture smooth-no chunks of butter! Whisk very hard or on high speed with a hand mixer for about 5 minutes to ensure the smoothest texture possible for your lemon cream. Transfer to airtight containers and refrigerate until you are ready to use or overnight.

Chiffon Layers:

1/2 c cake flour
3/4 t baking powder
1/2 t salt
2 egg yolks
1/3 c plus 2 T sugar
1/8 c Water
1/8 c vegetable oil
1/2 tsp vanilla
1/4 tsp cream of tartar
3 egg whites

Prepare two 6″ round or one 9″ round cake pan by brushing the bottom with melted butter, placing a circle of parchment paper in, and brushing with butter aging.

Sift together the flour, baking powder, and salt in a small bowl. Set aside.

Whisk the egg yolks and 1/3 cup of the sugar in a stand mixer until it ribbons when lifted. Add the water, oil, and vanilla and combine. Whisk in the dry ingredients until just combined and transfer to a medium bowl.

Rinse well and dry the bowl of your stand mixer.

Whip the egg whites and cream of tartar on high until very frothy. Slowly add the sugar and whip until stiff peaks form.

Whisk 1/3 of the whipped egg whites into the cake batter. Now gently fold in the rest. Pour into prepared cake pan(s).

Bake at 325 degrees until the top is very lightly golden brown and springs back when lightly touched.

Cool on racks for 15 minutes in the pan then remove and cool completely.

While the cake is cooling, make the Italian Meringue Buttercream.

Frosting:

4 egg whites
1/2 tsp cream of tartar
1/4 tsp salt
1 cup sugar
1/2 cup (1stick) butter-cut into cubes, room temperature
3 Tb of previously-prepared lemon cream

Whip the egg whites, cream of tartar, and salt on high speed until extra frothy. Gradually add the sugar and beat until stiff peaks form. Now add the butter, one cube at a time. Make sure to fully incorporate each cube before adding the next one.

Beat on high speed for about 10 minutes. You will see the mixture go from soupy to thicker, then crudely to thick and creamy. If your buttercream is stuck in the soupy stage, put the bowl in the freezer for 5 minutes or the fridge for 10 and try again.

Once the frosting is creamy and delicious-looking add the 3 Tb of lemon cream and mix on low speed until incorporated.

Put the frosting in the fridge for short periods of time or the freezer for long periods, until you are ready to frost your cake.

Once the layers have cooled, spread a thin layer of lemon cream on before
a layer of buttercream, then frost the rest of the cake with the buttercream. You will have a little bit of frosting left over which can be used for decorative details or kept in the freezer for later use.

Store your finished cake in the refrigerator. It tastes even better when it’s cool.

Have a great day!

Bar Cookies and Baking Books {Chipster Topped Brownies}

20120823-160910.jpg

On December 28, 2011, the three dogs that take up residence in my house preformed an all-too-familiar barking montage. But this time it was even more prolonged and frantic than usual, and it spurred me to rise from the depths of the couch and peer through the faceted, oval window of my front door. Perched on the ruddy step was a neat brown package patiently waiting to be claimed.

I retrieved the cardboard box and quickly called out. “Was anyone expecting an package?”

My father jumped up, stating that this was a belated Christmas present for none other than yours truly. My intrigue spiked about three levels. I grabbed some shears and had that baby torn open in eight seconds, flat (which is saying something, especially considering the industrial-strength super tape they use to seal those boxes).

I peeled back a layer of white packaging paper to reveal the sleek and shiny corner of a hardcovered book. My gift was a beautiful cookbook: Baking – From My Home to Yours, by Dorie Greenspan.

Now, up until that moment, I had never even heard of Dorie Greenspan. I immediately started flipping through the pages and didn’t stop until I had examined every recipe, story, and little gem of knowledge in that 514-page book.

One example of the genius wealth of creativity found in this book is the Chipster-Topped Brownie. I have been yearning to attempt this for a long, long time and I am so glad I finally did!

Now, we’ve all made brownies and we’ve all made cookies. But who could have guessed the bar cookie nirvana produced when the two are combined?!

Imagine a deep, rich chocolate brownie. Perfectly crumbly yet fudgey and gooey. The chocolate chip topping is a buttery combination of salty and sweet. A crispy shell gives way to an ooey-gooey middle that envelopes the melted morsels of semisweet chocolate. This double-decker dessert is to die for! One taster likened them to “eating cookie dough, straight” and who doesn’t love that?

I recommend eating them right out of the oven. Be careful not to singe your taste buds like I did. These bars can be made even more spectacular by pairing them with a scoop of vanilla ice cream or some whipped cream. They’re very delicate, so slice and transfer them with a cautious hand. I hope you fall in love with these just as much as I have.

Have a great day!

20120823-161049.jpg

Chipster-Topped Brownies

Recipe inspired by and adapted from Baking – From My Home to Yours, by Dorie Greenspan

Ingredients:

BROWNIE LAYER –

1/2 cup flour
4 oz chocolate chips
1/4 cup oil
1 egg
1/4 tsp salt
1 cup sugar
1/2 tsp vanilla

CHOCOLATE CHIP COOKIE LAYER –

1/2 cup butter
2/3 cup brown sugar
1 cup flour
1 tsp baking powder
1 egg
1/2 tsp vanilla
1/2 tsp salt
3/4 cup chocolate chips

Preheat oven to 350 degrees. Prepare a 7 x 8 inch pan but lining it with aluminum foil and coat the foil in cooking spray.

First, we’ll make the brownie batter. Create a make-shift Dutch Oven by placing a heatproof bowl over a saucepan of simmering water. Put the chocolate chips into the bowl and add the sugar and salt. Stir often with a wooden spoon until the chips have melted. Remove from heat, add the oil and vanilla, stir.

In a separate small bowl, whisk the egg. Put a couple of spoonfuls of the chocolate mixture into the beaten egg and whisk. Now add all of the egg to the melted chocolate and combine.

Sift the flour into the chocolate mixture and stir with a wooden spoon. Make sure there are no clumps of flour left. Pour evenly into the pan.

For the chocolate chip cookie layer, whisk together the flour, baking powder, and salt in a small bowl. Set aside.

In the bowl of a stand mixer, cream together the butter and brown sugar. Add the egg and vanilla and combine. Add the flour mixture in three parts, mixing after each addition. Be sure to scrape down the sides with a rubber spatula.

Stir in the chocolate chips with a wooden spoon. Drop the dough in large spoonfuls over the brownie batter and, using a rubber spatula or your hands, smooth over to cover the batter completely.

Bake for 25 to 30 minutes, depending on how gooey you would like your bars to be.

Remove from the oven and let cool for 15 minutes before cutting into bars (or you could just attack them right at this point).

Enjoy!

A Trifecta of Chocolate Delight {Triple Chocolate Cupcakes}

It’s no secret that chocolate can do incredible things. It can make you feel warm inside, comforted, nostalgic, and joyful. Just the other day I discovered a prophecy written on the wooden stick of a Dove Ice Cream bar. Emerging from the remnants of a hard chocolate shell and luscious (albeit, melted) vanilla ice cream came these words: “A little chocolate can help almost anything.” How true that popsicle stick was.

I was thinking about why this is and I knew it all had to do with the brain. So to accurately write this post, I had to do some research. I looked into the effects chocolate has on a persons’ brain. So here’s your Science lesson for the day: chocolate contains chemical compounds like Theobromine and Phenylethylamine that stimulate the same receptors in your brain that are stimulated by marijuana and heroin. Phenylethylamine is also the chemical released when you are falling in love. Eating chocolate creates pleasurable sensations in the brain, dulls pain, and induces a little euphoric feeling. So in a way, chocolate is just like a drug. I knew there was something tangible behind the fact that I can NOT stop eating it once I start! But not to worry, you aren’t going to get high off of your dessert. A 130 pound person would have to consume 25 pounds of chocolate at once to even get close to being “high”.

So the next time you feel tingle-ings of a chocolate craving coming over you, whip up these Triple Chocolate Cupcakes, you will be instantly satisfied. Judging by the name you might be thinking that this will be overpoweringly rich. You might even be picturing a large chocolate chip jumping up and socking you in the mouth with its chocolate-y flavor. Or maybe not…yeah, probably not. Anyways, do not be deceived! The cupcake has a fairly moderate milk chocolate essence and the frosting is light as air. It dances across your tongue, tip-toeing and tickling your tastebuds with its feathery texture. After eating one of these guys, your need for chocolate will be tamed but you won’t be feeling all jittery and chock-full of sugar. If you are intimidated by the thought of making something as fancy and European sounding as Italian Meringue Buttercream, I’m about to put those concerns to rest. This frosting is just about as easy as popping open a can of Duncan Hines and it will assuredly get you many more compliments. Just try it, please, for me. After a couple tries, you’ll be perfecting this professional icing without even having to look at a recipe. It’s simple and once you’ve got it down, you can add any number of flavorings to create any frosting taste under the sun. The possibilities are endless! This has become my go-to frosting choice and is a sweet addition to just about anything. I hope you enjoy!

Triple Chocolate Cupcakes

Ingredients:

CUPCAKE BASE-

1 cup flour
1/2 tsp baking soda
1 cup sugar
1/2 cup (1 stick) butter- softened
1/2 cup buttermilk
2 eggs- room temperature
1/2 tsp vanilla
1/2 cup chopped semisweet chocolate- melted
1/2 tsp instant coffee granules

CHOCOLATE ITALIAN MERINGUE BUTTERCREAM-

2 egg whites
1/4 tsp cream of tartar
1/4 tsp salt
1/2 cup sugar
1/2 cup (1 stick) butter- softened and cut into small cubes
1 1/3 cup pre-made chocolate frosting

A few chocolate chips to garnish each cupcake (optional)

Directions:

Preheat oven to 350° F. Line about 14 muffin cups with paper liners.

Sift together flour and baking soda. Set aside.

Cream together butter and sugar until light and fluffy. Beat in eggs, one at a time, scraping down bowl with a rubber spatula. Add vanilla and combine. Add melted chocolate and coffee granules. Beat in flour and buttermilk, alternating flour and milk. Bake 16 minutes, turning pans at halfway. Cool in pan for 15 minutes, them move to wire racks to cool completely.

To make frosting, whip egg whites, cream of tartar, and salt at high speed until extra, extra foamy. Continue to whip, slowly add sugar and beat until soft peaks have formed. Add the softened butter, a cube at a time, waiting 15 seconds between additions to fully incorporate. Now beat the frosting for about 7 minutes until it reaches a thick and creamy consistency that stands easily on its own. DO NOT overbeat the meringue! If this happens, it looks like grainy, curdled egg whites and your buttercream will not be salvageable! After the 7 minutes, turn off the mixer, add the pre-made chocolate frosting and mix on low speed, scraping down the sides with a rubber spatula.

Once the cupcakes are cool, pipe on the frosting and sprinkle on some chocolate chips.

If you have extra frosting, you can freeze it for later use, just bring it to room temperature and fluff it up by stirring before use.

I stored my cupcakes in the refrigerator and let them come to room temperature before serving.

Have a great day!